HBase通过访问Zookeeper来获取-ROOT-表所在地址,通过-ROOT-表得到相应.META.表信息,从而获取数据存储的region位置
hadoop搭建:
单节点搭建
- 下载hadoop压缩包,hadoop-2.5.2.tar.gz并解压.进入解压目录,修改jdk路径,修改文件etc/hadoop/hadoop-env.sh
export JAVA_HOME=/usr/local/jdk/
2.修改bashrc1
2
3
4
5
6
7export HADOOP_PREFIX="/home/worker/hadoop-2.5.2"
export HADOOP_HOME=$HADOOP_PREFIX
export HADOOP_COMMON_HOME=$HADOOP_PREFIX
export HADOOP_CONF_DIR=$HADOOP_PREFIX/etc/hadoop
export HADOOP_HDFS_HOME=$HADOOP_PREFIX
export HADOOP_MAPRED_HOME=$HADOOP_PREFIX
export HADOOP_YARN_HOME=$HADOOP_PREFIX
3.配置hdfs
修改$HADOOP_PREFIX/etc/hadoop/hdfs-site.xml1
2
3
4
5
6
7
8
9
10
11
12
13<configuration>
<property>
<name>dfs.datanode.data.dir</name>
<value>file:///home/alex/Programs/hadoop-2.2.0/hdfs/datanode</value>
<description>Comma separated list of paths on the local filesystem of a DataNode where it should store its blocks.</description>
</property>
<property>
<name>dfs.namenode.name.dir</name>
<value>file:///home/alex/Programs/hadoop-2.2.0/hdfs/namenode</value>
<description>Path on the local filesystem where the NameNode stores the namespace and transaction logs persistently.</description>
</property>
</configuration>
修改$HADOOP_PREFIX/etc/hadoop/core-site.xml:1
2
3
4
5
6
7<configuration>
<property>
<name>fs.defaultFS</name>
<value>hdfs://localhost/</value>
<description>NameNode URI</description>
</property>
</configuration>
4.配置yarn
修改$HADOOP_PREFIX/etc/hadoop/yarn-site.xml.1
2
3
4
5
6
7
8
9
10
11
12
13
14
15
16
17
18
19
20
21
22
23
24
25
26
27
28
29
30
31
32<configuration>
<property>
<name>yarn.scheduler.minimum-allocation-mb</name>
<value>128</value>
<description>Minimum limit of memory to allocate to each container request at the Resource Manager.</description>
</property>
<property>
<name>yarn.scheduler.maximum-allocation-mb</name>
<value>2048</value>
<description>Maximum limit of memory to allocate to each container request at the Resource Manager.</description>
</property>
<property>
<name>yarn.scheduler.minimum-allocation-vcores</name>
<value>1</value>
<description>The minimum allocation for every container request at the RM, in terms of virtual CPU cores. Requests lower than this won't take effect, and the specified value will get allocated the minimum.</description>
</property>
<property>
<name>yarn.scheduler.maximum-allocation-vcores</name>
<value>2</value>
<description>The maximum allocation for every container request at the RM, in terms of virtual CPU cores. Requests higher than this won't take effect, and will get capped to this value.</description>
</property>
<property>
<name>yarn.nodemanager.resource.memory-mb</name>
<value>4096</value>
<description>Physical memory, in MB, to be made available to running containers</description>
</property>
<property>
<name>yarn.nodemanager.resource.cpu-vcores</name>
<value>4</value>
<description>Number of CPU cores that can be allocated for containers.</description>
</property>
</configuration>
5.启动1
2
3
4
5
6
7
8
9
10
11
12
13## Start HDFS daemons
# Format the namenode directory (DO THIS ONLY ONCE, THE FIRST TIME)
$HADOOP_PREFIX/bin/hdfs namenode -format
# Start the namenode daemon
$HADOOP_PREFIX/sbin/hadoop-daemon.sh start namenode
# Start the datanode daemon
$HADOOP_PREFIX/sbin/hadoop-daemon.sh start datanode
## Start YARN daemons
# Start the resourcemanager daemon
$HADOOP_PREFIX/sbin/yarn-daemon.sh start resourcemanager
# Start the nodemanager daemon
$HADOOP_PREFIX/sbin/yarn-daemon.sh start nodemanager
集群安装
三台机器,运行一个namenode实例、一个resourcemanager实例,三个机器都运行datanode和nodemanager
1.接上一步操作,直接在单节点机器上操作,修改配置文件
修改$HADOOP_PREFIX/etc/hadoop/core-site.xml1
2
3
4
5
6
7<configuration>
<property>
<name>fs.defaultFS</name>
<value>hdfs://namenode.alexjf.net/</value>
<description>NameNode URI</description>
</property>
</configuration>
修改yarn-site.xml1
2
3
4
5
6
7<configuration>
<property>
<name>yarn.resourcemanager.hostname</name>
<value>resourcemanager.alexjf.net</value>
<description>The hostname of the RM.</description>
</property>
</configuration>
2.将整个hadoop文件夹拷贝到另外两个机器上
注意删除hdfs目录下datanode和namenode目录,否则会出现总有几个datanode无法起来的情况
3.启动1
2
3
4
5
6
7
8
9
10
11
12
13
14
15
16
17
18## Start HDFS daemons
# Format the namenode directory (DO THIS ONLY ONCE, THE FIRST TIME)
# ONLY ON THE NAMENODE NODE
$HADOOP_PREFIX/bin/hdfs namenode -format
# Start the namenode daemon
# ONLY ON THE NAMENODE NODE
$HADOOP_PREFIX/sbin/hadoop-daemon.sh start namenode
# Start the datanode daemon
# ON ALL SLAVES
$HADOOP_PREFIX/sbin/hadoop-daemon.sh start datanode
## Start YARN daemons
# Start the resourcemanager daemon
# ONLY ON THE RESOURCEMANAGER NODE
$HADOOP_PREFIX/sbin/yarn-daemon.sh start resourcemanager
# Start the nodemanager daemon
# ON ALL SLAVES
$HADOOP_PREFIX/sbin/yarn-daemon.sh start nodemanager
hbase集群搭建
参考网址:https://hbase.apache.org/book.html#quickstart
准备:
a,b,c三台机器都下载hbase的bin包(hbase-1.2.4-bin.tar.gz),并解压
进入解压后的目录,修改 conf/hbase-env.sh,配置java_home
节点安排:1
2
3a:master,zookeeper
b:master(backup),zookeeper,regionserver
c:zookeeper,regionserver
1.配置a节点ssh无密码登陆a,b,c。
注意,也要配置a机器本身
由于b节点作为备份的master,同样设置b节点ssh无密码登陆a,b,c
注意删除know_hosts文件中的相关记录,否则可能出现hostkey验证失败错误
2.修改conf/regionservers
删除localhost,添加b、和c的hostname或者ip1
2
3[root@103-16-29-sh-100-i05 hbase-1.2.4]# cat conf/regionservers
10.103.16.28
10.101.1.229
3.新增文件conf/backup-masters:1
2[root@103-16-29-sh-100-i05 hbase-1.2.4]# cat conf/backup-masters
103-16-28-sh-100-i05.yidian.com
4.配置zookeeper1
2
3
4
5
6
7
8<property>
<name>hbase.zookeeper.quorum</name>
<value>node-a.example.com,node-b.example.com,node-c.example.com</value>
</property>
<property>
<name>hbase.zookeeper.property.dataDir</name>
<value>/usr/local/zookeeper</value>
</property>
5.配置b和c机器
将a机器的配置文件目录conf文件夹拷贝到b和c对应的位置
6.在a机器启动所有实例
确认所有机器都没有hmaster、HRegionServer, and HQuorumPeer实例在运行,执行bin/start-hbase.sh
此时可能需要输入yes,同时注意删除know_hosts文件中的相关记录,否则可能出现hostkey验证失败错误
若启动成功,在三台机器都使用jps命令将看到各个实例都已启动。
7.webui查看
master机器上登陆ip:16010可看到web 界面
opentsdb安装
1.依赖安装1
yum install gnuplot
2.下载rpm包,安装1
rpm -iv opentsdb-2.2.1.rpm
安装后程序目录结构:1
2
3
4
5
6
7
8
9/etc/opentsdb - Configuration files
/tmp/opentsdb - Temporary cache files
/usr/share/opentsdb - Application files
/usr/share/opentsdb/bin - The "tsdb" startup script that launches a TSD or commandline tools
/usr/share/opentsdb/lib - Java JAR library files
/usr/share/opentsdb/plugins - Location for plugin files and dependencies
/usr/share/opentsdb/static - Static files for the GUI
/usr/share/opentsdb/tools - Scripts and other tools
/var/log/opentsdb - Logs
3.修改配置文件/etc/opentsdb/opentsdb.conf
修改以下几项:1
2
3tsd.core.auto_create_metrics = true
tsd.core.meta.enable_realtime_ts = true
tsd.storage.hbase.zk_quorum = localhost(若hbase安装在本机可以不修改此项)
4.创建opentsdb表:1
env COMPRESSION=NONE HBASE_HOME=path/to/hbase-0.94.X /usr/share/opentsdb/tools/create_table.sh
5.启动tsd1
nohup /bin/tsdb tsd >/dev/null 2>&1 &
日志会自动写入/var/log/opentsdb/opentsdb.log
6.登陆http:127.0.0.1:4242查看界面
openfalcon配置修改
修改falcon-transfer配置文件,修改enable和address两厢,其余保持默认即可1
2
3
4
5
6
7
8
9
10"tsdb": {
"enabled": true,
"batch": 200,
"connTimeout": 1000,
"callTimeout": 5000,
"maxConns": 32,
"maxIdle": 32,
"retry": 3,
"address": "10.103.16.29:4242"
}
重启transfer,之后数据便会存储到opentsdb中。
通过登陆opentsdb的web界面可以查看。
grafana配置
1.下载grafana的rpm包,安装,启动1
service grafana-server start
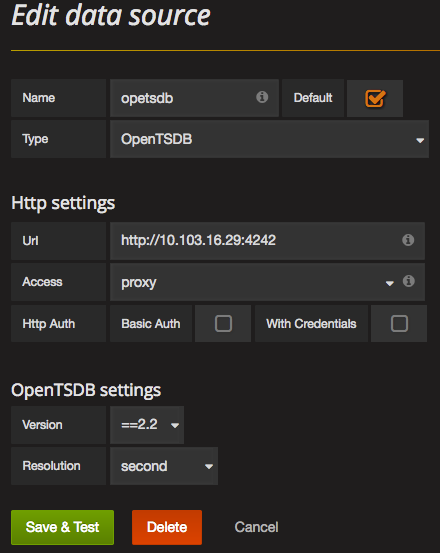
2.添加opentsdb源
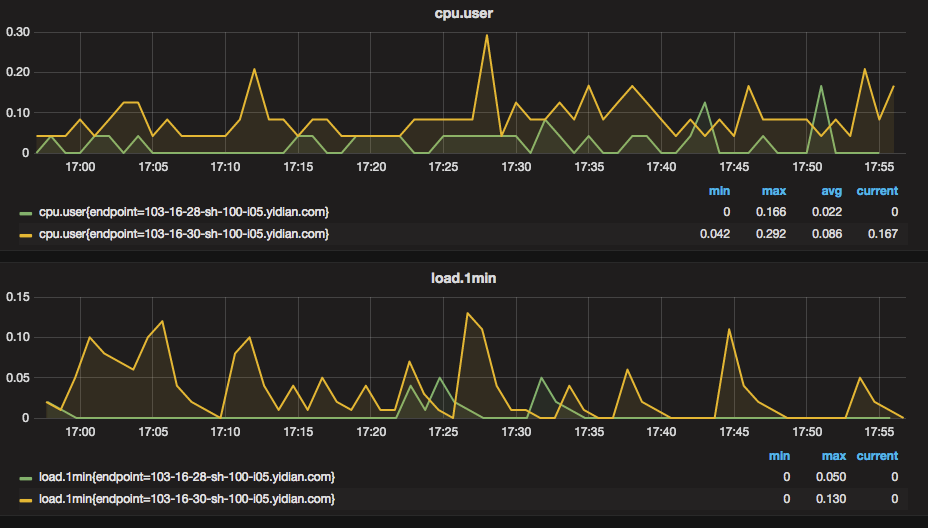
3.添加监控趋势图: